Running a 10 Gbit network and making sure that you get the supposed bandwidth requires more effort than “plug and play”, which works for 1 Gbit. In this article I’ll describe my struggles and lessons learnt.
Background
In the first post in this series, I described the server I had chosen for my new FreeNAS installation. I then installed FreeNAS 13.2 on it and I was ready to test some network performance.
At this point I had everything wired up using SFP+ copper DACs. The theory was that the CPU speeds and the bandwidth of the PCIe buses of the individual computers would be sufficient to achieve my desired throughput.

A First Test
For starters, I just ran iperf3 between all three machines:
- Windows 10/ASUS XG-C100F
- FreeBSD 12 (FreeNAS)/Supermicro AOC-STGN-i1s (Intel)
- Ubuntu 18 running on VMware 6/Mellanox ConnectX-2
The results were horrible! The way to read this table is: the client is listed in the leftmost column and the server in the remaining. So, for example, when the ASUS card running in Windows 10 was on the client side of iperf3 and the server ran on FreeBSD and the Intel-based card, the throughput was 1.12 GBit. Pretty far from 10 Gbit. Also, note that there was packet loss and retries in one configuration.
| Mellanox | Intel | ASUS | ||||
| Speed | Retries | Speed | Retries | Speed | Retries | |
| ASUS | 3.04 | 1.12 | N/A | – | – | |
| Intel | 4.38 | – | – | 1.58 | 0 | |
| Mellanox | – | – | 2.44 | 100 | 1.59 | 0 |
With these poor numbers I wasn’t sure where to start. I did know that I needed to set the MTU properly. For 10 Gbit one wants to use jumbo frames, but in theory, switching to jumbo frames should give ~10% better efficiency. Something else was wrong here too. Still this is where I started.
Turning on Jumbo Frames. Right.
At a first glance, a jumbo frame is 9000 octets, you enable them in the OS and boom, you’re set. No. Some hardware/software combinations give you an MTU value that makes you scratch your head.
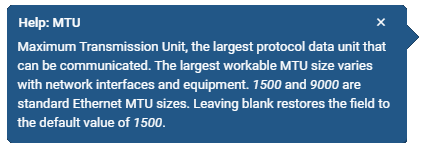
In VMware, the maximum size of a jumbo frame is indeed 9000. Easy enough. FreeNAS also wants you to type in 9000. It even has this little balloon help popup.

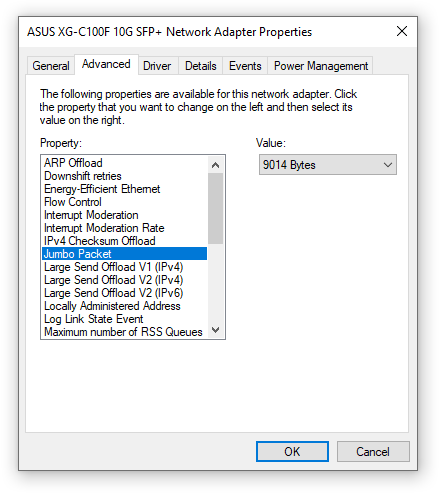
Then it got more interesting. Windows wants jumbo frames to be 9014 bytes.

I was too lazy to run a packet capturing tool to find out exactly why, but my guess is that the 14 bytes are the Ethernet II header, and that Windows wants to make it explicit. Then again, such frames should end with a four byte Ethernet checksum… You tell me.
Finally, MTU on a Mikrotik switch is broken down into “regular” MTU and L2MTU, so two numbers need to be set. Their wiki page explains it in detail.
Doing Path MTU Discovery
So, what was my MTU? I wasn’t sure. 9000? 9014? Or some other number because I set up the L2MTU incorrectly? It was time to do path MTU discovery on a three node path 🙂
Of course, the ping command has different options for all operating systems. On BSD it’s:
ping -D -s <packet size> <host>
On Windows, ICMP ping with the “don’t fragment” bit is produced like so:
ping -f -l <packet size> <host>
And on Linux, I had to run:
ping -s <packet size> -M dont <host>
I turned out that the effective packet size was 8972 bytes, which med sense because 8 bytes were used for the ICMP header, and 20 for the IP header.
The truly important thing here was that I knew that jumbo frames were being used across my little network and that I was ready to measure performance for real.
Iperf3 Issues
After having set up jumbo frames, I hit another bump. Running iperf3 “out of the box”, like iperf3.exe -c <hostname>, produced unreliable results! The reported bandwidth could fluctuate between ~3 Gbit and 7 Gbit on two consecutive runs. Eventually, I got around this by running three parallel streams (using the -P 3 option). Why this happens is an interesting issue. Maybe it was a TCP slow start thing. In hindsight, I should have done my testing using UDP, or at least taken advantage of iperf3’s optimizations, like suggested in this article.
Windows Firewall Issues
At this point i was getting roughly 7 Gbit, but where were the rest? I decided to temporarily turn of my software firewall in Windows (no, I’m not running Microsoft’s firewall). Lo and behold! Here were my missing 3 GBit!
D:\iperf3>iperf3.exe -c freenas
Connecting to host freenas, port 5201
[ 4] local 192.168.10.18 port 62514 connected to 192.168.10.200 port 5201
[ ID] Interval Transfer Bandwidth
[ 4] 0.00-1.00 sec 1.04 GBytes 8.92 Gbits/sec
[ 4] 1.00-2.00 sec 1.13 GBytes 9.71 Gbits/sec
[ 4] 2.00-3.00 sec 1.13 GBytes 9.73 Gbits/sec
[ 4] 3.00-4.00 sec 1.13 GBytes 9.67 Gbits/sec
[ 4] 4.00-5.00 sec 1.13 GBytes 9.68 Gbits/sec
[ 4] 5.00-6.00 sec 1.14 GBytes 9.75 Gbits/sec
[ 4] 6.00-7.00 sec 1.14 GBytes 9.81 Gbits/sec
[ 4] 7.00-8.00 sec 1.11 GBytes 9.52 Gbits/sec
[ 4] 8.00-9.00 sec 1.14 GBytes 9.79 Gbits/sec
[ 4] 9.00-10.00 sec 1.14 GBytes 9.76 Gbits/sec

[ ID] Interval Transfer Bandwidth
[ 4] 0.00-10.00 sec 11.2 GBytes 9.63 Gbits/sec sender
[ 4] 0.00-10.00 sec 11.2 GBytes 9.63 Gbits/sec receiver
Additional Tinkering
While googling around for various solutions to my little challenges, I stumbled across this article about tweaking network adapters in Windows. I wasn’t very scientific about what I tried, but turning off Interrupt Moderation sounded like something that would work given my hardware. According to the article, it’s a way trade latency for some more CPU load. I wasn’t super scientific about recording the performance gain here, but it did something for the performance, and I think the article was good reading.
Final Results
When the dust had settled, I had arrived at the following performance figures:
| Mellanox | Intel | ASUS | ||||
| Speed | Retr | Speed | Retr | Speed | Retr | |
| ASUS | 9,27 | – | 9,84 | – | ||
| Intel | 9,72 | 249 | 9,82 | 0 | ||
| Mellanox | 9,86 | 0 | 9,17 | 0 |
This was good enough for me. It would seed that the Supermicro/Intel card was performing slightly better than the one from ASUS, but given all other sources of error, it’s hard to tell.
Final Benchmarking Checklist
- If running legacy hardware, or hardware where the PCIe bus is the limiting factor, make sure that the cards are installed in fast enough slots; at least in PCIe 2.0 x 4. See this article for the numbers. Nowadays not many machines run PCIe 2.0 though.
- Make sure that the MTU is what you think it should be. One option is pinging with large packets and the don’t fragment bit set.
- If using iperf3, try running parallel streams. For some reason, it gives more stable reported results.
- If using iperf3, try using optimization options like -Z or -O and/or consider using UDP.
- If running Windows, make sure that you’re running the latest drivers from the vendor of the card. Windows may have some drivers, but they may be a bit dated. Theoretically, this advice should apply to all operating systems.
- If running Windows, temporarily turn off the software firewall for better performance.
- If running Windows, try experimenting with some of the adapter settings, like suggested in this article.
