In this three-part series, I describe a homelab infrastructure project where I build a 10Gbit NAS/SAN. The line between a NAS and a SAN is quite blurry these days, hence “SANAS”.
Background
I’m running 10 Gbit at home between my work computer and an old VMware server with a Mikrotik CRS305-1G-4S+IN doing the switching. Having a few 10 gig ports available, I wanted to explore what one can do with iSCSI and a 10 Gbit network. My plan was to actually build a small SAN (small indeed, because there’d be one NAS on it) that would supply some extra disk space for my work computer as well my current and future VMware server(s).
My wish list was:
- Quiet: The box would be on my desk. I’m willing to accept some fan noise, but in reality “quiet” means low TDP; like between 25 and 35 Watt.
- Small: I only have so much space on my desk, and I wanted to cram the thing into my little rack, so it would have to take up 1U and be no deeper than 30 cm.
- 10 Gbit capacity: The thing would need to hold a 10 Gbit NIC and have the horsepower to feed it.
- As many SATA ports as possible, but at least four. Again, this being a NAS, my minimal requirements were 2 non-redundant disks and one mirrored disk = at least 4 SATA connectors.
Hardware
Inspired by videos like this I started browsing for parts.
After a few hours, I got tired of trying to find a suitable combination. I turned out to be much harder than I thought to find a chassis, a CPU, and a motherboard that would work together and satisfy my requirements, while not being shipped from the other side of the globe; I simply wasn’t patient enough to mix and match my own parts and then wait for them. Instead, I settled for some Supermicro hardware:
- A 505-203B chassis
- An A2SDi-4C-HLN4F motherboard with an integrated Intel Atom C3558 CPU running 4.x2.2 GHz at a TDP of 16 W. It also has 4 integrated NICs.
- An AOC-STGN-i1s 10 Gbit NIC
- 16 Gb of ECC RAM
This is actually a bundle sold by a vendor here in Sweden. I did hit a bump along the road: whatever I tried, the (only) PCIe slot was dead on this thing, but the vendor just replaced the motherboard and everything started working. When I got the server, I tried Windows 8, VMware 7, and FreeNAS 13.2 on it just to see if all NICs (the four integrated 1 Gbit and the 10 Gbit) would be picked up, and they were. That’s good to know: this hardware configuration can be used with a variety of current operating systems.
In fact, I really like this package. The chassis is very open and is great for passive cooling. It also has all connectors on the front, which is important for rack builds. The motherboard can hold 4x64GB of DDR4 ECC RAM, and the CPU is good enough for most purposes, especially given its TDP. If you use the PCIe slot (at a maximum of 4x) you get 4 SATA channels plus an M.2 connector for a system boot disk. If you opt out of the PCIe slot, you can get 8 SATA connectors.
Everything looked great at this point. My only worry was the speed of 4x PCIe and 10 Gbit NIC and… THE JET ENGINE FOR A FAN at the back of the pre-built machine. Being a real server, noise reduction didn’t seem to be a parameter. In such cases, my automatic reaction is to throw out the fan and replace it with a Noctua equivalent. However, I started reading up on it and it turns out that Noctua fans are good when it comes to airflow but the jet engine fans provide high static pressure, which is what you need to punch through the shape of a heatsink and get air moving (you do learn something new every day). To summarize a few threads on the Internet: don’t replace noisy stock server fans with Noctua equivalents!
And this is where I need to insert my disclaimer:
If you duplicate the setup in described in this blog post or make a variation thereof, you do it at your own risk and I am not to be hold responsible for any direct or indirect damage. This blog post is a narration, not an instruction!
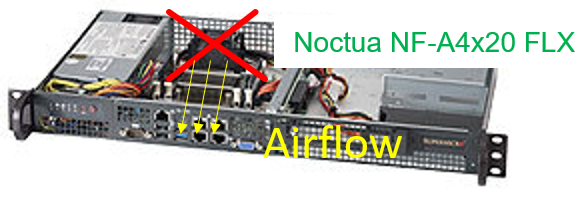
With the disclaimer out of the way I can say this… 16 watts and a noisy fan that draws air away from a CPU in a chassis full of holes. We can’t really talk about optimized airflow, can we? So, I went with the Noctua option and not only that, I pointed the fan inwards, so that it blows air over the CPU. My reasoning here was that all the holes in the chassis would do some good for the circulation.

I ran a CPU stress test before and after replacing the fan, and after 30 minutes, jet engine sucking out air gave a temperature of 56 °C, while the Noctua produced no more than 52 °C. Frankly, I think I would have been fine without the fan altogether, but I sleep better at night knowing that something moves the air around…. 16 watts or not.
That’s it for today! In the next post, I’ll describe how I tested the performance of the network and tinkered with jumbo frames.
